Difference between revisions of "Account Management"
(→How to Add More Users) |
|||
| Line 10: | Line 10: | ||
The Account Management looks different in the Enterprise version.<br><br> | The Account Management looks different in the Enterprise version.<br><br> | ||
[[File:1accountmanagement.jpg|800px]]<br><br> | [[File:1accountmanagement.jpg|800px]]<br><br> | ||
| − | |||
== How to Add More Users == | == How to Add More Users == | ||
Note that adding users is not the same as adding licenses. | Note that adding users is not the same as adding licenses. | ||
| + | |||
| + | On the left you can see is the system user information. By default, there are two user licenses available. Add a user by clicking on [[File:+.png|20px]] '''Add User''' on the bottom left corner. This will prompt you to input the e-mail address of the new user. Specify the privileges of the user by checking or unchecking the desired categories. When you finish, click “Send.” The activation link will send to the e-mail address of the new user and will expire in 2 hours. | ||
| + | |||
| + | |||
| + | == How to Add More Licenses == | ||
Click on [[File:Changesub.JPG]]. To add more users, you must first "Add User Licenses." Click on [[File:+.png|20px]] '''Purchase additional user licenses''', and input how many licenses you would like to add. When you click Confirm, the price of another license will be automatically added to your monthly subscription. | Click on [[File:Changesub.JPG]]. To add more users, you must first "Add User Licenses." Click on [[File:+.png|20px]] '''Purchase additional user licenses''', and input how many licenses you would like to add. When you click Confirm, the price of another license will be automatically added to your monthly subscription. | ||
| + | |||
== Cancel Subscription == | == Cancel Subscription == | ||
Click on [[File:Changesub.JPG]]. You can cancel your Enterprise subscription by clicking '''Cancel Subscription''', then [[File:Confirm.JPG]].<br> | Click on [[File:Changesub.JPG]]. You can cancel your Enterprise subscription by clicking '''Cancel Subscription''', then [[File:Confirm.JPG]].<br> | ||
Revision as of 16:45, 2 June 2016
UNDER CONSTRUCTION
For a single user, the Account Management allows you to view and purchase credits as well as upgrading to an Enterprise account.
Contents
Enterprise Account
An Enterprise Account is useful especially for companies that write many reports. When upgrading, users can create unlimited reports and add multiple users to access the account.
Account Management
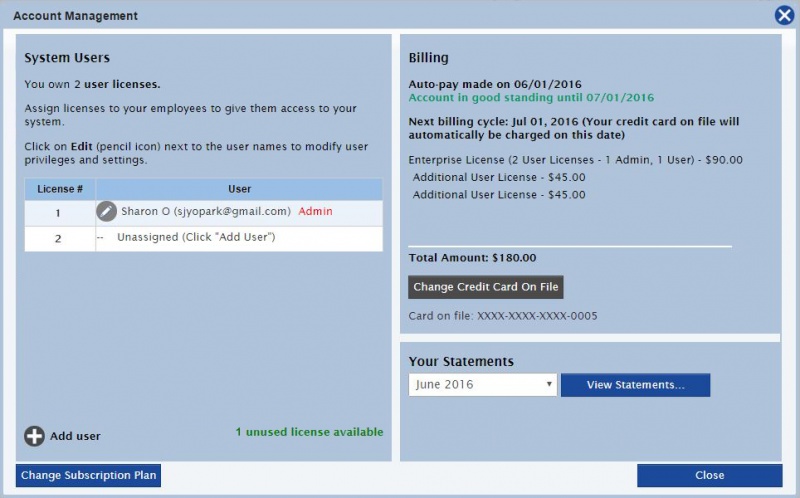
The Account Management looks different in the Enterprise version.

How to Add More Users
Note that adding users is not the same as adding licenses.
On the left you can see is the system user information. By default, there are two user licenses available. Add a user by clicking on ![]() Add User on the bottom left corner. This will prompt you to input the e-mail address of the new user. Specify the privileges of the user by checking or unchecking the desired categories. When you finish, click “Send.” The activation link will send to the e-mail address of the new user and will expire in 2 hours.
Add User on the bottom left corner. This will prompt you to input the e-mail address of the new user. Specify the privileges of the user by checking or unchecking the desired categories. When you finish, click “Send.” The activation link will send to the e-mail address of the new user and will expire in 2 hours.
How to Add More Licenses
Click on . To add more users, you must first "Add User Licenses." Click on
![]() Purchase additional user licenses, and input how many licenses you would like to add. When you click Confirm, the price of another license will be automatically added to your monthly subscription.
Purchase additional user licenses, and input how many licenses you would like to add. When you click Confirm, the price of another license will be automatically added to your monthly subscription.
Cancel Subscription
Click on . You can cancel your Enterprise subscription by clicking Cancel Subscription, then
.