Difference between revisions of "Inspectors"
From Kiosk Documentations
(→How to Add a New Inspector) |
(→How to Add a New Inspector) |
||
| (4 intermediate revisions by the same user not shown) | |||
| Line 6: | Line 6: | ||
==How to Add a New Inspector== | ==How to Add a New Inspector== | ||
#Open the Inspectors window by clicking on Inspectors in the Navigation Panel. | #Open the Inspectors window by clicking on Inspectors in the Navigation Panel. | ||
| − | #Click | + | #Click '''New Inspector''' on the bottom left. |
#Input the inspector information. | #Input the inspector information. | ||
| − | # | + | #When importing the signature, make sure to sign with a dark black pen or Sharpie and scan. Then import the signature as an image file (.jpg, .png, .gif, .tif, .bmp). |
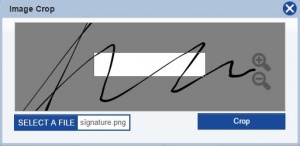
#Position the signature to fit in the white box by dragging the image, and/or clicking the magnifying glass on the right to zoom in and out.<br><br>[[File:Signature1.JPG|300px]][[File:Signature2.JPG|300px]]<br><br> | #Position the signature to fit in the white box by dragging the image, and/or clicking the magnifying glass on the right to zoom in and out.<br><br>[[File:Signature1.JPG|300px]][[File:Signature2.JPG|300px]]<br><br> | ||
| − | # | + | #'''Crop''' when the signature is aligned.<br><br>[[File:Edit2.JPG]]<br><br> |
#Click [[File:save.JPG]] when finished. | #Click [[File:save.JPG]] when finished. | ||
<br> | <br> | ||
| + | |||
| + | ---- | ||
To edit an inspector, click on the [[File:Edit.png]] icon next to the entry you want to edit. | To edit an inspector, click on the [[File:Edit.png]] icon next to the entry you want to edit. | ||
Latest revision as of 16:26, 16 May 2016

Users can input Inspectors in the database to quickly and easily fill out Termite Reports.
How to Add a New Inspector
- Open the Inspectors window by clicking on Inspectors in the Navigation Panel.
- Click New Inspector on the bottom left.
- Input the inspector information.
- When importing the signature, make sure to sign with a dark black pen or Sharpie and scan. Then import the signature as an image file (.jpg, .png, .gif, .tif, .bmp).
- Position the signature to fit in the white box by dragging the image, and/or clicking the magnifying glass on the right to zoom in and out.
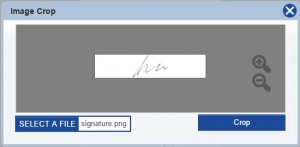
- Crop when the signature is aligned.
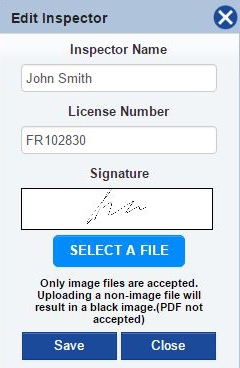
- Click
 when finished.


To edit an inspector, click on the ![]() icon next to the entry you want to edit.
icon next to the entry you want to edit.
To delete an inspector, check the small box to the left side of the names, then click ![]() . You may check more than one entry at a time.
. You may check more than one entry at a time.