Difference between revisions of "Inspection Tags"
From Kiosk Documentations
| (4 intermediate revisions by the same user not shown) | |||
| Line 1: | Line 1: | ||
[[File:Itags.jpg|800px]] | [[File:Itags.jpg|800px]] | ||
<br><br> | <br><br> | ||
| − | + | ||
| − | <br>[[File:Taglist.JPG]]<br> | + | ==How to Create Custom Inspection Tags== |
| − | To delete an entry, check the small box to the left of the tag name and click [[File:Deleteselected.jpg]]. You may check more than one box to delete at the same time. | + | #Hover over '''Codebook''' in the top navigation panel, then select '''Inspection Tags'''. |
| + | #Simply input the tag name in the text box located on the bottom, then click [[File:Addtag.JPG]] to save it in the list.<br> | ||
| + | <br>[[File:Taglist.JPG]]<br><br> | ||
| + | #To delete an entry, check the small box to the left of the tag name and click [[File:Deleteselected.jpg]]. You may check more than one box to delete at the same time. | ||
| + | |||
| + | ==Using Custom Inspection Tags in the Termite Report== | ||
| + | #In the Termite Report, the section for Inspection Tags is located on the front page towards the bottom.<br> | ||
| + | #Click directly on the text to select. Upon selection, the text will be highlighted blue.<br><br>[[File:Itagstr.JPG]]<br><br> | ||
| + | #Edit or add new Inspection tags by clicking on the [[File:Edit.png]] icon. | ||
Latest revision as of 18:32, 6 June 2016

How to Create Custom Inspection Tags
- Hover over Codebook in the top navigation panel, then select Inspection Tags.
- Simply input the tag name in the text box located on the bottom, then click
 to save it in the list.

- To delete an entry, check the small box to the left of the tag name and click
 . You may check more than one box to delete at the same time.
Using Custom Inspection Tags in the Termite Report
- In the Termite Report, the section for Inspection Tags is located on the front page towards the bottom.
- Click directly on the text to select. Upon selection, the text will be highlighted blue.
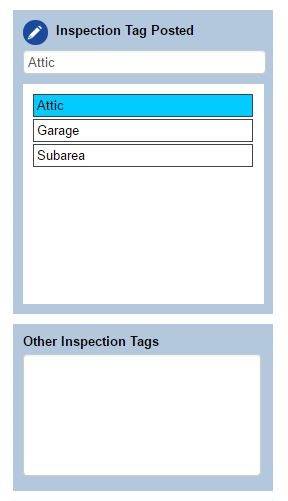
- Edit or add new Inspection tags by clicking on the
 icon.
icon.
