Difference between revisions of "Emergency Contacts"
From Kiosk Documentations
(→Managing Emergency Contacts) |
|||
| (15 intermediate revisions by the same user not shown) | |||
| Line 8: | Line 8: | ||
==How to Add a New Emergency Contact== | ==How to Add a New Emergency Contact== | ||
| − | <br>[[File: | + | <br>[[File:Econtact.JPG|500px]]<br> |
| − | #Open the | + | #Open the Emergency Contacts window by hovering over Codebook in the Navigation Panel and clicking Emergency Contacts. |
| − | # | + | #Edit the group name at the top by clicking on the [[File:Edit.png]] icon, then click '''Update'''.<br><br>[[File:Editgroup.JPG|450px]]<br><br> |
| − | #Input the | + | #Input the contact information. You can add multiple contacts in the group by clicking on '''[[File:+.png|25px]] Add another entry''' at the bottom left.<br><br>[[File:Addecontact.JPG|450px]]<br><br> |
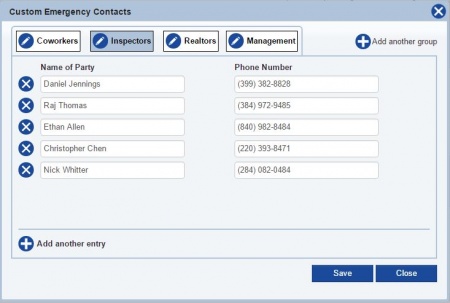
| + | #You may also add more groups.<br><br>[[File:Econtacti.JPG|450px]]<br><br> | ||
#Click [[File:save.JPG]] when finished. | #Click [[File:save.JPG]] when finished. | ||
<br> | <br> | ||
==Using Emergency Contacts in Termite Reports== | ==Using Emergency Contacts in Termite Reports== | ||
| − | <br>[[File: | + | <br>[[File:Econtact4.jpg|700px]]<br> |
| − | To use your custom | + | To effectively use your custom Emergency Contacts in termite reports, you can go through the process until you reach the Findings & Recommendations section (F&R), or you can skip directly to the step by clicking on the square box under F&R in the process line located at the top. |
| − | #Scroll down to the | + | #Scroll down to Custom Emergency Contacts in the Tail Section, press the drop down arrow and click on the group you want to select. |
| − | #If you wish to keep the | + | #The contacts are automatically filled out in the section.<br><br>[[File:Econtactex.JPG|400px]]<br><br> |
| − | *You may also edit and add new | + | #If you wish to keep the contacts as the default for every termite report, check the mini box on the right (Doing this will not effect previous reports). |
| + | *You may also edit and add new contacts right then and there by clicking on the [[File:Edit.png]] icon next to '''Custom Emergency Contacts'''. | ||
==Managing Emergency Contacts== | ==Managing Emergency Contacts== | ||
| − | To | + | To delete a contact, click the [[File:X.png|25px]] icon to the left of the name. <br> |
| − | <br> | + | To delete a group, click on the [[File:Edit.png]] icon next to the group name and click '''Delete Group'''. |
| − | To delete a | + | |
| − | + | ||
| − | + | ||
| − | + | ||
| − | + | ||
| − | + | ||
| − | + | ||
| − | + | ||
| − | + | ||
| − | + | ||
| − | + | ||
| − | + | ||
| − | + | ||
| − | + | ||
| − | + | ||
| − | + | ||
| − | + | ||
| − | + | ||
| − | + | ||
| − | + | ||
Latest revision as of 21:32, 10 May 2016

Users have an option to enter their own custom Emergency Contacts to the termite report in addition to the county numbers.
Contents
How to Add a New Emergency Contact

- Open the Emergency Contacts window by hovering over Codebook in the Navigation Panel and clicking Emergency Contacts.
- Edit the group name at the top by clicking on the
 icon, then click Update.
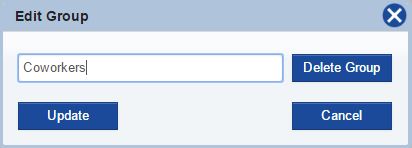
- Input the contact information. You can add multiple contacts in the group by clicking on
 Add another entry at the bottom left.
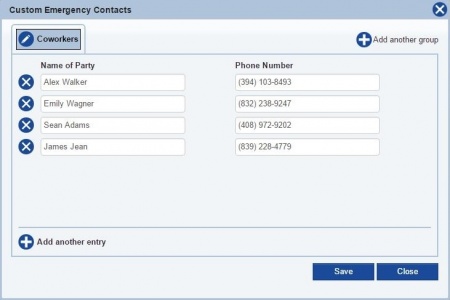
- You may also add more groups.
- Click
 when finished.


Using Emergency Contacts in Termite Reports

To effectively use your custom Emergency Contacts in termite reports, you can go through the process until you reach the Findings & Recommendations section (F&R), or you can skip directly to the step by clicking on the square box under F&R in the process line located at the top.
- Scroll down to Custom Emergency Contacts in the Tail Section, press the drop down arrow and click on the group you want to select.
- The contacts are automatically filled out in the section.

- If you wish to keep the contacts as the default for every termite report, check the mini box on the right (Doing this will not effect previous reports).

- You may also edit and add new contacts right then and there by clicking on the icon next to Custom Emergency Contacts.
Managing Emergency Contacts
To delete a contact, click the ![]() icon to the left of the name.
icon to the left of the name.
To delete a group, click on the ![]() icon next to the group name and click Delete Group.
icon next to the group name and click Delete Group.